Picture Polish is now such a big polish brand but I remember back in the day when they were just starting out and every single polish was on my wish list. I never got around to owning any of them though! So when they contacted me to be part of their 2016 features, I couldn’t say no!
I have 3 beautiful polishes to show you, all of them with perfect 2 coat formulas. Picture Polish seriously has the most simple but breathtaking combinations – they’re all right down my alley.
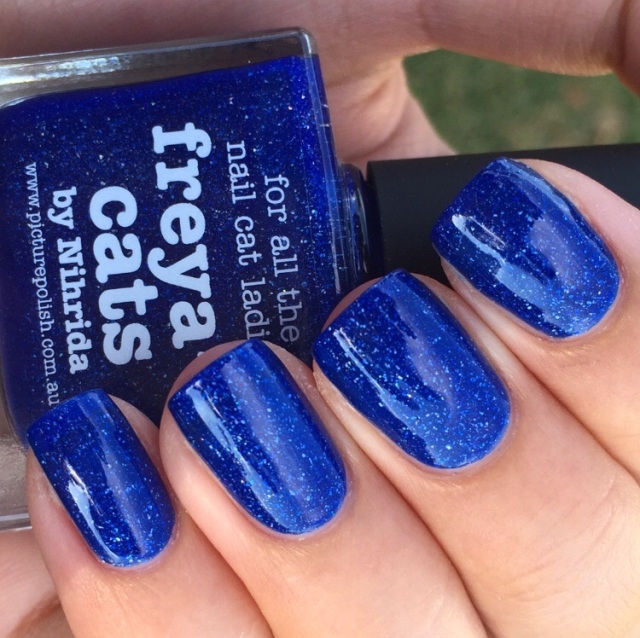
Picture Polish Freya’s Cats: a stunning royal blue with holographic flecks. Reminds me of Revlon’s Royal but on drugs 🙊
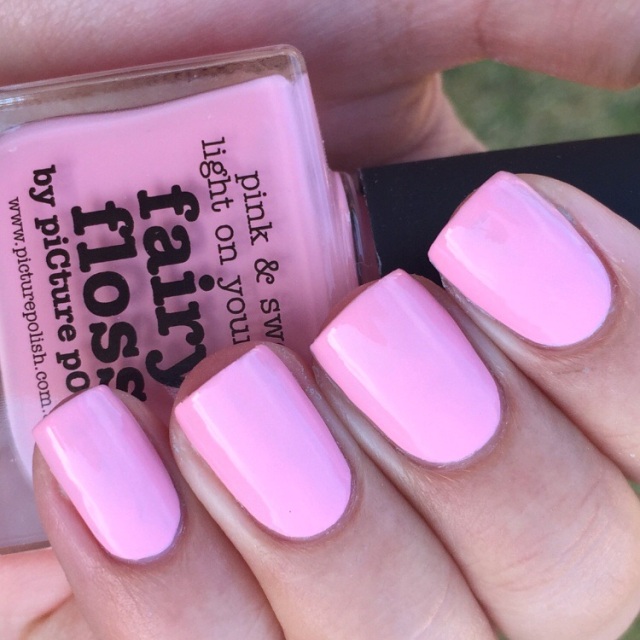
Picture Polish Fairy Floss: a basic baby pink with an excellent formula. A great staple in a collection and for Spring. I’ll definitely be wearing this a lot!
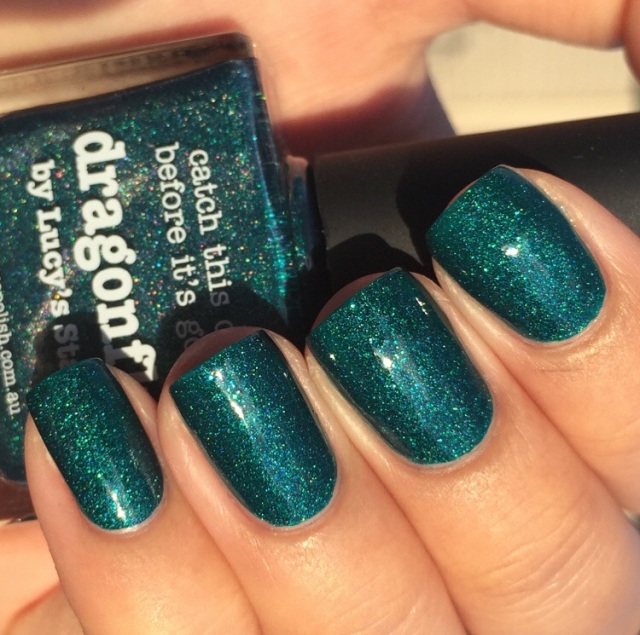
Picture Polish Dragonfly: beautiful emerald green chocablock full of holo and shimmer. This pic was taken in the sun to show it’s rainbow sparkle.
Hope you love these as much as I do!
You can purchase Picture Polish from http://www.picturepolish.com.au. They also have a list of international stockists on their website.
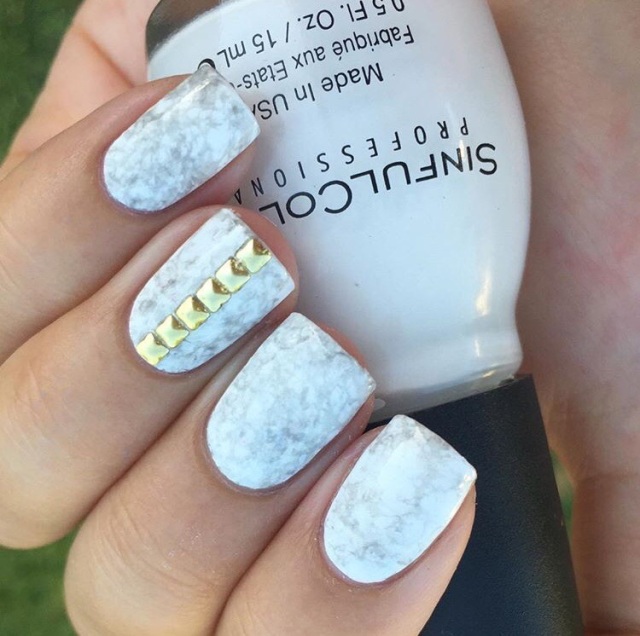
Marble is in this season, and not just for nails. It’s all over dinnerware, notebooks, cheese plates, couch cushions and more. One only has to breeze through Kmart (fave store!) to see the influence that marble has been having on design.
And who can blame them? It’s sleek, modern, versatile. It has the air of elegance while it’s monochromatic nature makes it a beautiful base for accent colours. Metallics such as gold or copper are perfect accompaniments.
Surprisingly, marble nails are very easy to do. I checked out a few YouTube channels whom combine glad/Saran wrap + water spotting techniques to achieve this look. For beginners I recommend Cutepolish’s marble nails video.
The results are subtle hints of grey and white contrasting with the flash of the gold studs.
I can’t wait to improve on this technique in the future and to continue with my marble obsession. Laptop cover, phone case, and now nails… no one stop me! 😍
Polishes used:
Sinful Colors ‘Snow Me White’, NYX Girls ‘Perfect Gray’ and studs from Born Pretty Store.
Whoa, can you believe it’s almost Halloween already?? Polish makers are already releasing Halloween collections and I’m still stuck in January hahaha.
Anyway, Lyz Cosmetics is a new-to-me Aussie indie brand operating out of Melbourne. This collection was made in collaboration with @nerdybroccoli in releasing mascots representing the brand? I think! Haha it’s been a while since I’ve been on the swatching grind, but I definitely recommend visiting @lyzcosmetics on Instagram for proper info about their giveaways and deals.
Onto the polish!
Boo! I Sea You! is made up of blue and gold holo glitters in a clear base. I originally attempted reaching opacity with it on its own but the layers got a bit too thick around 3 coats for my liking. I ended up layering this over black and it applied very well in 1 coat plus top coat. The glitter was distributed pretty evenly. A few coats of top coat will be necessary to smooth the surface.
Mistress of the Dark is a purple chrome-like base with strong pink shimmer, particular in the sun. This was on the brushstroke-y side during application but it evened out when it dried. It’s also one of those foil-like polishes that show every ridge on your nail bed so I recommend base coat. This was 2-3 coats plus top coat.
Dead Partying Bride is made up of tiny blue and pink circle and silver diamond glitter in a shimmery pink base. The formula was on the thin side but easy to use. It took me 4 coats plus top coat in this swatch but definitely layer it over a similar base colour for a more opaque result.
Salem’s Eye is made up of gold holo glitters in a black jelly base. Formula was on the thicker side but easy to apply in 2-3 coats plus top coat. This is require a few coats of top coat to smooth out the surface as well.
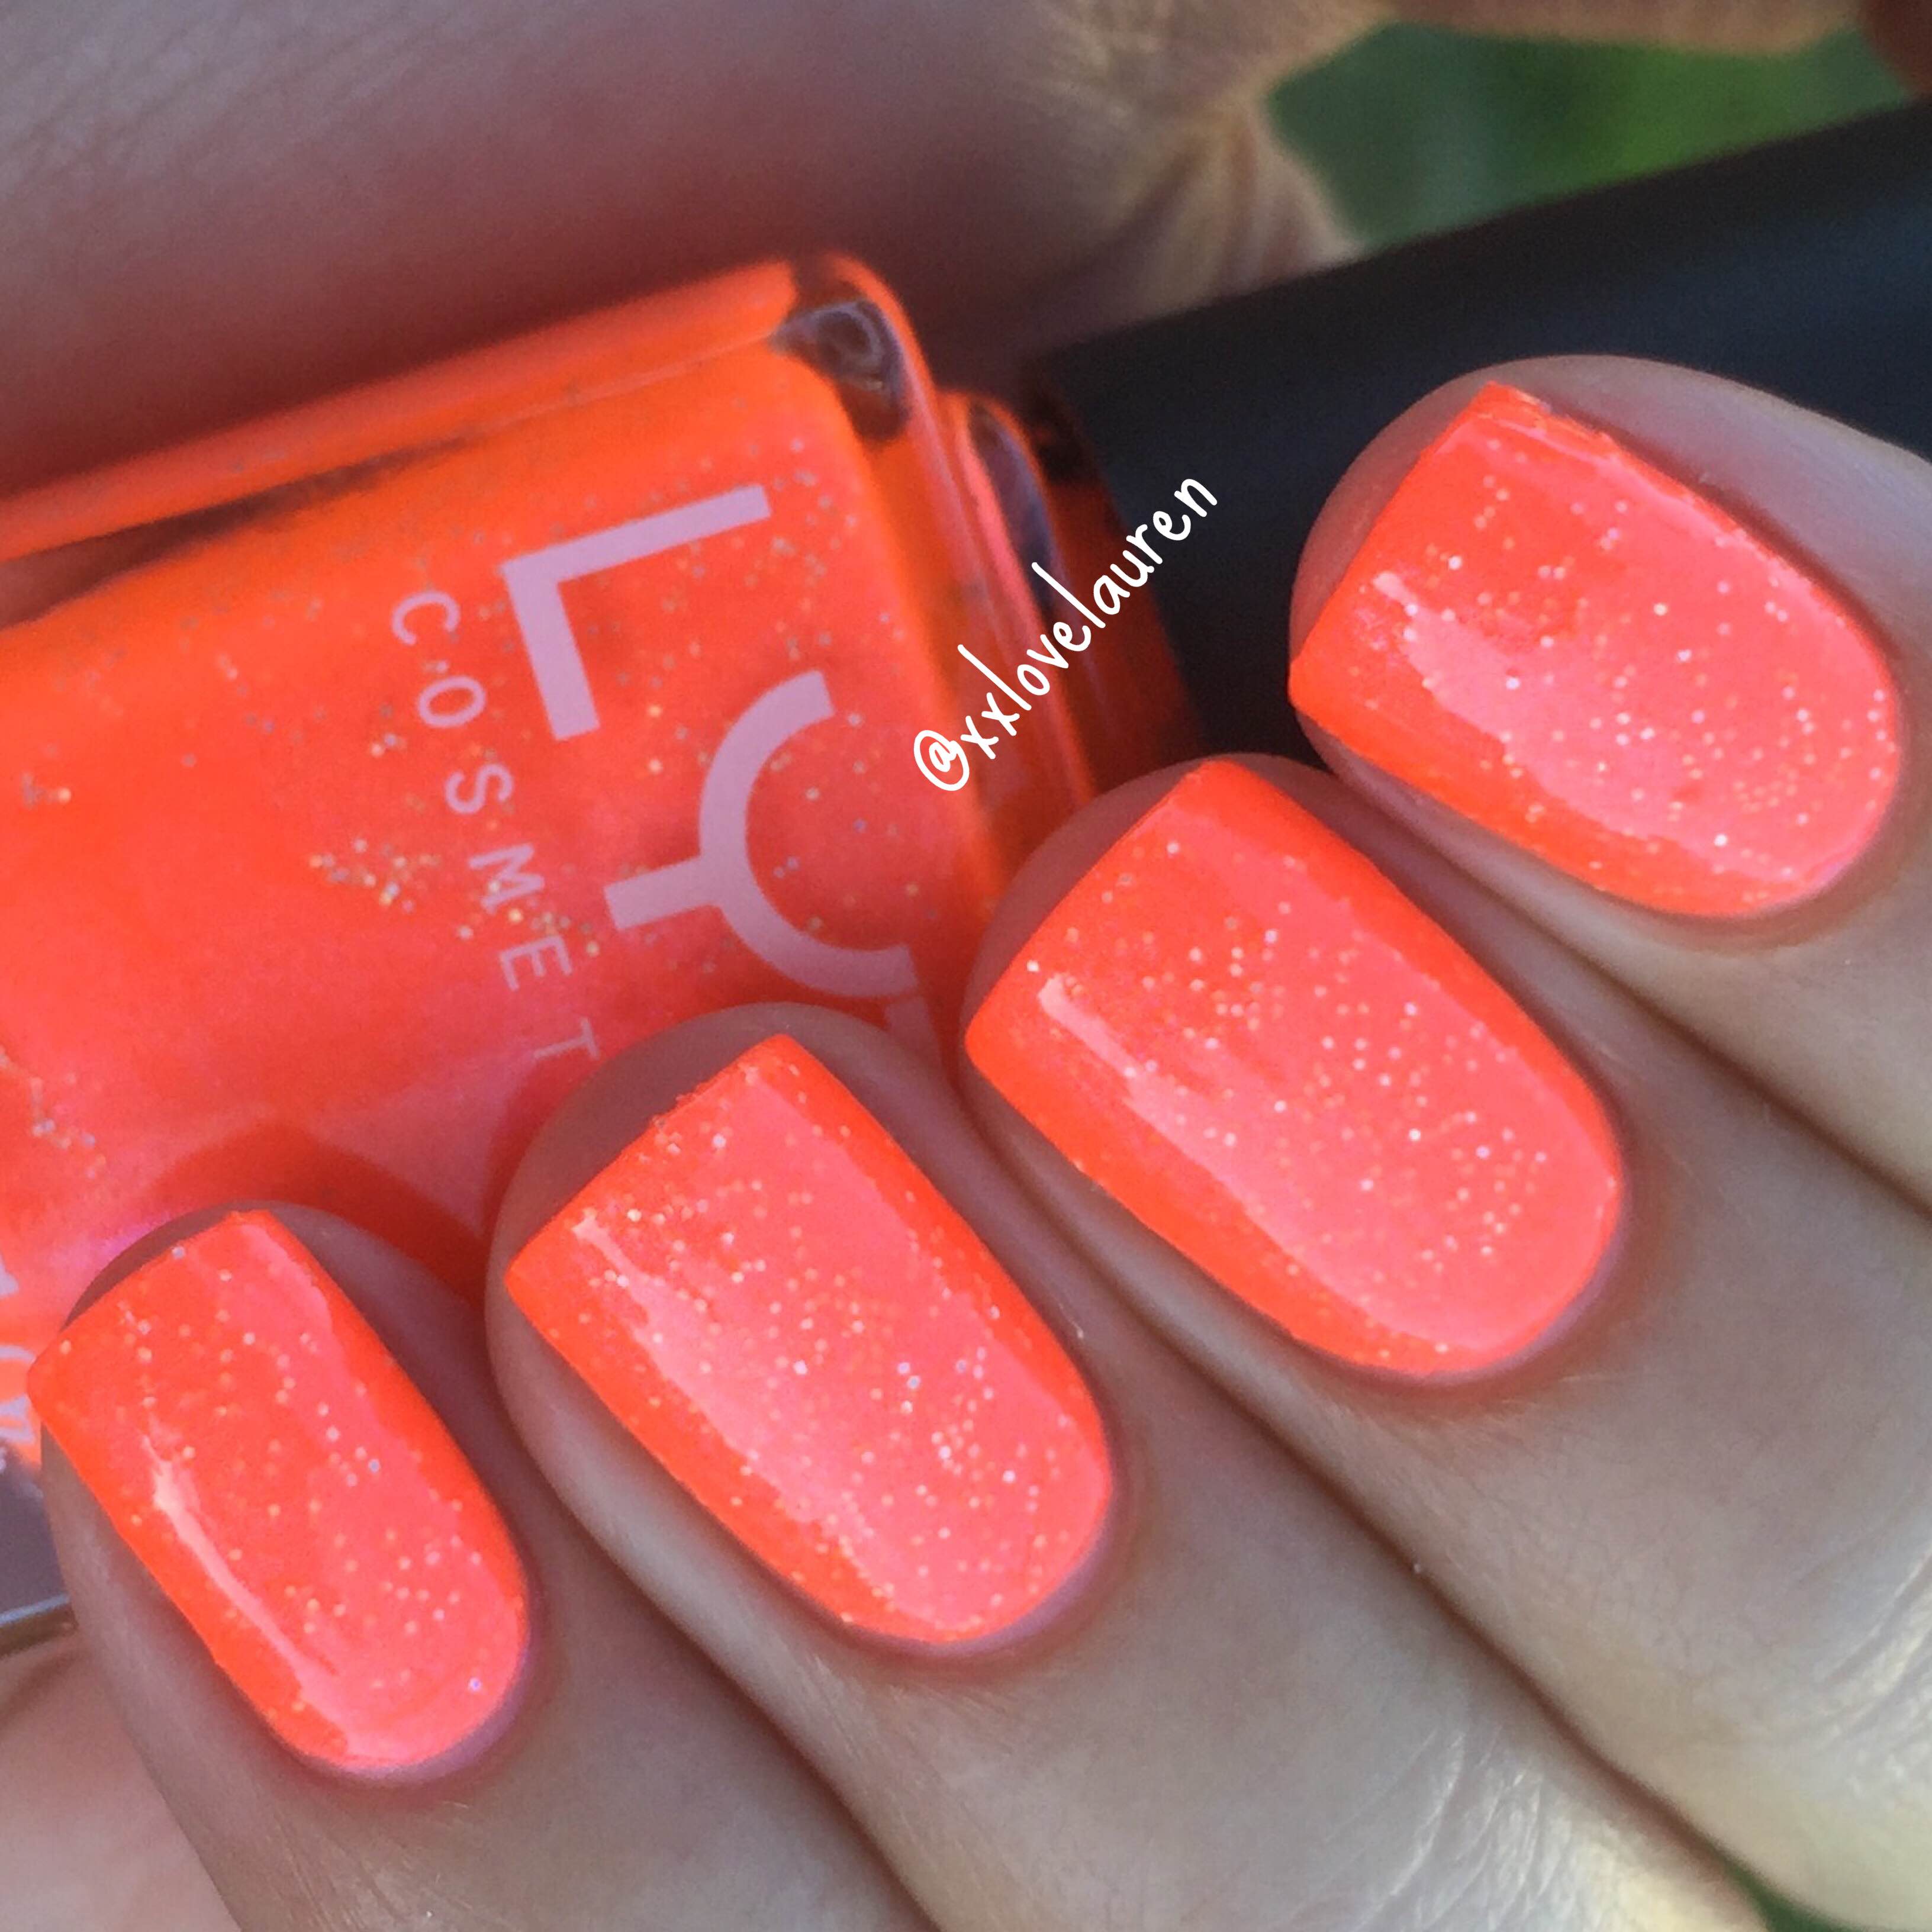
And last up is Pumpkin Chunkin, a bright, and I mean bright neon orange with strong pink shimmer and small silver glitters. The formula was fantastic and fast-drying; good in 2 coats plus top coat.
For this week only, for any purchase of 2 or more of their polishes, Lyz Cosmetics is giving away a free Heart Crossed Lovers Chain Ring valued at $11.95. How fab is that!
For more information on where to purchase this brand, visit my Where to buy tab.
Recently I heard some of the worst news that could happen to anyone, and I wish with all my life that it didn’t happen to someone I looked up to so much. Selena is famous for her nails, but she’s also a beautiful, lovely person and nobody deserved this less. I don’t want to go into what exactly happened, but some info is available on certain instagram accounts.
No manicure can ever change what happened but I love that the nail community is able to band together and show support for one of our own. The #sparklesforayla tag now has over 700 posts, and I hope, no matter how small, it helps Selena a little.
Polishes used: China Glaze ‘Spring in My Step’, Sinful Colors ‘Snow Me White’ and Revlon ‘Stunning’.
Studs from Born Pretty Store: use the code ‘FGJ61’ for 10% off your entire order.
Sending my love and prayers to Selena and her family at this time. x
Going through some of the old swatches on my camera and doing little posts for them, if y’all don’t mind!
This is the gorgeous Imaginarium* from Pretty Pots Polish’s Cinematix Collection. It’s packed full of multicoloured rainbow glitter in different shapes in a white crelly base (which, as you all know, is my favourite type!!) This was 3 easy coats plus top coat.
For more information on purchasing this brand, visit my ‘Where to buy‘ tab.
Helloooo! Finally, a post! After being hella busy with exams and assignments, it feels so nice to be able to find some time to edit pics and write a post. I have so many swatch pics on my camera just waiting to be posted.
The My Precious* collection was actually officially released quite a while back (sorry for the late post Vicky!), but is definitely still available at Bella Belle’s etsy store. I forgot to take these swatches with flash, but trust me the holo adds a whole other dimension to these polishes. Without further ado…
Garnet* is a juicy, rich red jelly filled with holo glitters and bars. Now I know how some of y’all feel about bar glitters and the ‘hairy’ look, but this collection changed the way I thought about them! They bars lie flat, easily smoothed out with top coat, and look pretty amazing within the depths of the jelly base. Consider me a convert! This was 2 easy coats plus two coats of top coat (for extra gloss).
Ameythst* is the purple version: my fave!! The formula on this one was thinner, and a little runnier so be careful with cuticle flooding. Lucky clean up is pretty easy. This was 3 coats plus 2 coats of top coat.
Last up is Sapphire*, the brilliant blue version! This was 2 coats plus 2 coats of top coat. I found this one on the thicker side and the bars liked to stick together a little more. I recommend doing thinner coats for easier application.
This collection is out now, visit my ‘Where to buy‘ tab for purchasing details!
I love it when indie brands come up with amazing new products that big manufacturers haven’t even thought of. Bella Belle’s new Soy Polish Remover* is a prime example.
Made from a renewable plant source, has zero volatile components, and the barest of strawberry fragrance (which smells like nothing at all!) this is quite an innovative alternative to the harsh chemicals in acetone removers. Coolest of all, it comes in a nail polish bottle for easy application.
Simple steps:
Apply the remover like you would a normal polish, onto the manicure you want to remove. I use a generous amount, and it’s definitely 100% okay to be a bit messy and get it all over your cuticles because guess what? It’s good for your cuticles too!
The instructions I was given said to wait 2-3 minutes for the remover to soak in. Although this works, it means you might have to reapply the remover again and wait a few more minutes to remove everything. I found that the longer you wait, the easier the polish is to remover all in one go. For these pictures I waited about 5-6 mins.
Using a lint free cotton pad, or any tissue/cotton ball you have, scrub it back and forth across the nail to remove all the polish.
Repeat if necessary.
Done! Nice bare nails!
Some minor downsides may be that it is a kind of slower process than normal removers which can be wiped off the nail straightaway. This one involves some waiting time. It also requires a bit of scrubbing but not much more than when I use Sally Hansen removers actually. It’s mainly more effective for creme/shimmer/jelly polishes whereas glitters will definitely require more reapplications and scrubbing.
Nevertheless, I highly recommend this polish for people looking for a less harsh alternative to normal acetone removers. It’s a very effective concept that I can see myself using a lot in the future. One of the biggest upsides is that it leaves your cuticles nice and hydrated compared to acetone removers. The oils moisturise your cuticles instead of drying them out, which is a big win in my books! Just make sure you wash your hands before applying a new polish to your bare nails!
For information on how to purchase this product, visit my ‘Where to buy‘ tab.
Hay guys! I know I’ve been gone for a while but uni got in the way again, sigh. I’ll hopefully be posting intermittently until I have time for more regular posts again.
A while ago I was contacted to review The Monthly Nail international subscription box which was very exciting. According to the website, the system works basically like:
Choose a ‘monthly nail level’ that suits your budget and style.
Customise the box every month through designing your own indie polish colours as well as choose to include OPI and Essie.
Enjoy!
In all, depending on what you choose you will receive about 2-4 polishes every month for a cost of about $15.99-$23.99 (not including shipping for international customers, although shipping is free within the US). For more info, check out their FAQ’s.
Now onto the fun stuff.
I was sent 2 polishes from their exclusive indie brand Eugene Malibu.
Electric Zoo* is a blue shimmer packed with iridescent blue flakies. There is a purplish duochrome that’s visible in the bottle but sadly that doesn’t translate to the nail. I found the formula watery but somehow gluggy and stringy which made it difficult to apply. Kind of like applying PVA glue. It was a little sheer but built up to opacity in 3 coats. Make sure each previous coat is dry however, otherwise you’ll be dragging up the bottom layers.
Sweet Life* was wayy better to use. An adorable, delicate glitter topper, I can see people wearing/using this for baby showers! It’s made up of satin white stars and blue dots with a smattering of holo squares and smaller glitter, as well as blue flakies in a clear base. I used one easy coat over Essence Give Me Nude, Baby!. The stars and dots needed some fishing but nothing too hard.
For more information on purchasing details, visit my ‘where to buy’ tab.
If there’s one nail art style that I have never even tried to conquer, it’s zebra print. I swear other nail ladies can free-hand these like they’re straight from a zebra’s skin and I’m just sitting here struggling to even get a realistic leopard print, lol!
This is where stamping comes in 😉
I’ve never tried to stamp before and naturally assumed I’d be bad at it so I avoided it at all costs. But when Born Pretty Store contacted me about reviewing some of their products, I thought I’d give it a go, and I’m very pleased with the product.
This is the manicure I managed. Being a first-timer, I wasn’t really confident stamping all my nails (in case they didn’t match and look nice) so I went for an accent nail instead. It’s the perfect amount of art to jazz up any manicure!
Polishes used: Bella Belle Nail Couture Golden Helm*, Sinful Colors Snow Me White, Ulta3 Black Satin.
The stamping plate* I used is found here and comes with a few other whole nail and smaller designs (which I have yet to try!). The plate is small and compact, a thin round disc around 5.5cm in diameter. Each whole nail print is about 1.2 x 1.5cm which fits just perfectly on my nail, but may be problematic for those with wider nail beds. Make sure to peel of the blue plastic protective layer before use or you’ll be wondering why nothing is working!
The stamper* and scraper* I used is found here. The stamper is about 2.3cm in diameter and is slightly domed so you have to either push down firmly on the plate when trying to pick up the image, or do it in a small rolling motion from one side to the other. This is also the case for transferring the image from your stamp to your nail – if you have quite curved nails like mine, a rolling motion is needed to get the stamp to cover the entire surface of the nail. This was the hard part because I had a lot of difficulty either aligning the image straight or missing bits on my nails by not pressing down firmly enough. Practice makes perfect though!
I had some issues with the scraper. It seemed pretty harsh on the plate, and failed to evenly scrape off the excess polish on the image, leaving a thin film over the spaces meant to be blank. If I pressed harder, I would dig up some of the polish from the grooves and that prevented a crisp image. I ended up ditching the scraper altogether and using an old gift card instead, which worked much better.
It is important to note that not all polishes work for stamping. You can either buy special polish made especially for stamping purposes, which are thicker and take longer to dry, or you can do some of your own trial and error to see if you own any that could work. Typically, one-coater cremes and metallics work best.
As you can see, this isn’t 100%. The image isn’t crisp, I moved slightly when I stamped so the lines aren’t that nice, and there are patches here and there where I didn’t pick up the image well. I think this was attempt #4? Still a long way to go to master stamping, but I was pretty happy with this result!
So in summary:
Pros
Cheap
Easy nail art
Simple idea to grasp
Lots of different designs
Cons
It takes a few tries before you can get something decent!
You must work fairly fast or the polish can dry on the stamp.
You have to clean the plate/stamp after each use.
Not all polishes work.
What do you guys think? Have you stamped before?
Here’s a 10% off code for all my followers! Don’t forget Born Pretty Store has free shipping worldwide, on all their items with no minimum spend; how awesome is that!
Hey guys, today I have something quite new on the blog.
Gel nails are usually a professionally-done manicure requiring a UV or LED light and special nail products to enable a mani that can last up to 2 weeks. It usually requires soaking in acetone for removal as well, which is harsh on your skin and nails. Professional gel nails can also get quite pricey too.
I guess that’s why recently, a lot of brands have released their own DIY gel nail kits for the simpleton like me to give it a go at home. I’ve never had a gel manicure done before so I’m not quite sure what to do or what to expect, but I followed Essence’s instructions as closely as I could and had a few thoughts on the product.
Here’s the promotional how-to video made by Essence, except I have the mini version of the LED lamp*. The instructions given to me with my review documents were a little confusing so I followed the steps in the video instead. In simple words:
Prep your nails by shaping them and pushing back your cuticles.
Swipe the cleanser over your nails to clean the surface.
Apply primer to your clean nails (it should dry quickly).
Apply a thick and even coat of peel-off gel base to your nail, making sure you wipe off any that comes into contact with your skin. Remember to wrap your free-edge.
Cure under the LED lamp for 10 seconds. (I did one nail at a time for this step, i.e. first nail, base coat and lamp. Second nail, base coat and lamp. Etc).
Wipe off any excess with more cleanser.
Apply your choice of any Essence colour (any polish would work). Let it dry completely.
Apply a thick and even coat of the clear gel top coat, remembering to wrap your free edge, and cure under the lamp again.
Wipe off any excess with cleanser.
Manicure is complete!
Ok, so it sounds pretty lengthy, but here are the results I got. Colour used: Essence Hello Marshmallow!*
I must confess, this is a really finicky process, especially for someone so used to easy polish application. The fact that I had to keep going back and forth between lamp and polish and the rules and procedures kinda annoyed me lol, so I guess gel polish isn’t something for me. It took me about 3 goes to get a halfway decent result – this picture is my third attempt, and I’m not sure if it’s user error or the product’s fault that gives me crazy thick layers of polish that therefore make it easier to peel off before you want it to. The instructions do ask for a thick coat… I tried using thin coats however and this caused more difficulty in removal and the cleanser tended to wipe off the top coat altogether.
The top coat also had a yellowish tint that affected the colour of the polish underneath. It also tended to shrink under the LED light, pulling away from the edges of the nail in uneven ridges. I doubt this is user error as I am normally able to evenly apply top coat without an issue.
This was the result of the top coat shrinking and leaving bits uncovered. You can also see a bit of the yellowish tinge of it in this photo. Not happy!
Also no matter how much cleanser is used, the final products always remains a little sticky.
One request from my instagram followers was a wear test to see if this manicure lasted its claimed 10 days. Unfortunately on the same day I applied it…
This was after one shower. The polish lifted off my ring and pinky so I had to peel the whole thing off. The forefinger is definitely seeing some tip wear.
A plus side is that it does peel off quite easily (albeit before I wanted it to), forgoing the need for acetone soaking like in professional gel manicures.
But does it last longer than a normal manicure? No, not for me. I was quite disappointed that it didn’t even make it through to the next day and this really discourages me from trying it again. However, other people who have used this product seem to have achieved mixed results (see Cherry Colors, Love Sweet As, AnnaBeautyBox) so I guess it’s up to you guys whether you want to take the risk or not.
Let me know what you guys think!
For more information on where to purchase this brand, visit my ‘where to buy‘ tab.